by jphilo | Nov 18, 2015 | Recipes
 Just in time for the big Thanksgiving grocery shopping trip, here’s the recipe for the Fabulous Franklin Chex Mix. The recipe traces its roots back to Zoe Hemmingson, one of Mom’s fellow teachers at Franklin School in Le Mars, Iowa.
It’s been a family favorite at Thanksgiving and Christmas since the late 1960s Mom used to make a batch in November and another in December. She’s abandoned the shopping and cooking duties, though she still pays for the ingredients, but sends one her kids to shop. These days she enjoys watching her children or grandchildren do the measuring, mixing, and cooking…and performing her quality control, taste-testing duties. Rock on, Mom!
Franklin Teachers’ Chex Mix
Mix together in a large bowl:
1 box Crispex (17 ounce)
5 cups Cheerios
4 – 5 cups pretzels and mixed nuts (proportion as you like)
Mix together in a small bowl:
1/2 cup melted butter or margarine
1/2 cup melted bacon grease*
1 tablespoon garlic powder
1 1/2 tablespoons Worcestershire sauce
Divide mixed, dry ingredients amongst three or four large cake pans. Pour wet ingredients over cereal mix and stir well. Bake at 200 degrees for 2 hours. Stir and turn off the oven. Leave mix in oven until the oven cools. Cool Chex Mix. Store in airtight containers.
*This secret ingredient is essential for the mix’s unique taste. Please ignore recent research that shows the secret ingredient may cause cancer.

by jphilo | Nov 11, 2015 | Recipes
 This post is the culmination of a three part series that began with DIY adobo seasoning, which was an ingredient in the raspberry chipotle sauce used in today’s delicious chicken recipe. I first tasted this dish at a church potluck and made it for my daughter and her family a few weeks later. We all loved it, and I’m looking forward to making it again soon, and the Man of Steel is looking forward to eating it.
Chicken with Raspberry Chipotle Sauce
2 grilled chicken breasts sliced into thin strips
1 batch low sugar raspberry chipotle sauce
1 red, yellow, or orange sweet bell pepper cut into thin strips
1 large onion, sliced into thick strips
Place grilled chicken strips in the bottom of a crock pot. Place peppers and onions on top of the chicken. Pour the raspberry chipotle sauce over all. Put lid on crock pot and cook on low for 4 hours.
Serve in tortillas or over rice. Feeds 4.

by jphilo | Nov 4, 2015 | Recipes
 Today’s recipe is the second in a series leading to a bang up main dish to be featured next Wednesday. The original recipe can be found at the Food Renegade website. I substituted the DIY adobo seasoning from last Wednesday’s post for the Swanson Organic Mexican adobo and upped the jalepeno peppers for more zing. The sauce goes together quickly and easily. It’s delicious on grilled meat or fish, as well as in next week’s main dish.
Low-Sugar Raspberry Chipotle Sauce
2 tablespoons olive oil
2 jalepeño pepper, seeded and minced
1 tablespoon apple cider vinegar
2 cups of fresh or frozen raspberries
1/4 cup honey
2 teaspoons DIY adobo seasoning
Heat olive oil in a frying pan over medium heat. Add minced jalepeño peppers and cook until caramelized. Slowly add apple cider vinegar and stir gently, scraping the bottom of the pan to loosen the browned jalepeño bits. Add raspberries, honey, and adobo seasoning.

Cook down until sauce forms, stirring regularly. Lower the heat and simmer until reduced to desired thickness. Remove chipotle sauce from heat and pour into jar or bowl. Allow to cool before serving.

by jphilo | Oct 28, 2015 | Recipes

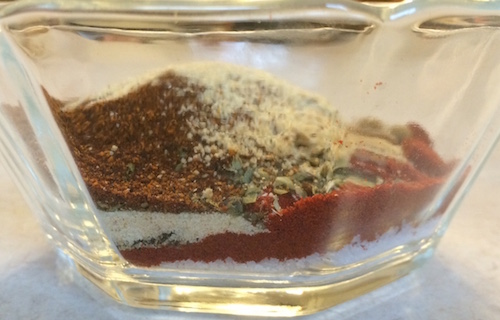
Today’s recipe comes from the she-can-make-it-one-handed-without-knives file. It’s also part of a three step recipe process that will culminate in a few weeks with a most delicous chicken recipe. The sauce for the chicken dish called for adobo seasoning. But the prepared bottle contained so much MSG, it was all that could be tasted. So I threw it out and found what I needed at allrecipes.com. The only change I made in Traci’s original recipe was to use kosher salt instead of table salt. The resulting mix will be used in next week’s sauce recipe. It can also be sprinkled on chicken, pork, beef, and salmon to add a bit of zing.
DIY Adobo Seasoning
2 tablespoons salt
1 tablespoon paprika
2 teaspoons ground black pepper
1 1/2 teaspoons onion powder
1 1/2 teaspoons dried oregano
1 1/2 teaspoons ground cumin
1 teaspoon garlic powder
1 teaspoon chili powder
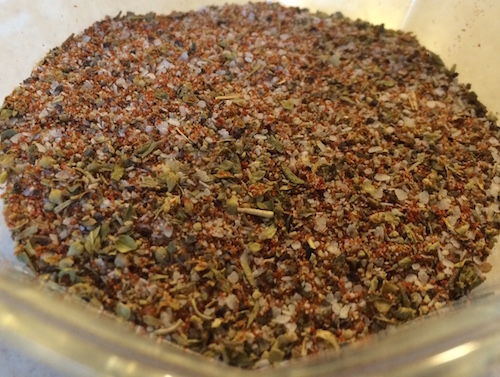
Put all ingredients in a small bowl. (use a glass bowl to see the pretty layers, like in the top photo.) Mix carefully with a spoon until all ingedients are combined and it looks something like this.
 Store in an airtight container. It will last as long as everything else in your spice cupboard does.

by jphilo | Oct 21, 2015 | Recipes
 With my cooking skills curtailed, testing new recipes is on hold for the foreseeable future. So here’s a rerun of a pumpkin spice lover favorite. It’s easy, sort of healthy, and dairy-free without any tweaking.
Pumpkin Bread
3 1/2 cups flour 1 cup sugar
2 tsp. baking soda 1 cup oil
1 1/2 tsp. salt 4 eggs
1 tsp. cinnamon 2/3 cup water
1 tsp. nutmeg 2 cups canned pumpkin
1 cup chopped walnuts (optional)
Preheat oven to 350 degrees. Mix dry ingredients together, then mix in wet ingredients and nuts. Pour into 3 greased loaf pans. Bake for 1 hour or until golden brown. Let cool for at least thirty minutes before taking them out of the pans. (I sometimes make the bread in large tin cans so the slices will be round. If you do that, cut down the baking time.)
How to Make Pumpkin Filling:
- With a large, sharp knife cut pie pumpkin in half.
- Remove the stem and throw away.
- Use an ice cream scoop to scrape the seeds and stringy matter from the cavity of the pumpkin.
- Slice each half into 3 or 4 wedges.
- To steam the pumpkin, cover either the bottom of roasting pan or dutch oven with water. Place pumpkin wedges in the pan. Put the covered roasting pan in the oven for about an hour at 350 degrees. Or put the dutch oven on the stove and let simmer for about an hour or until the pumpkin is fork tender. Remove from heat.
- When the pumpkin is cool, remove the outer skin. Cut the pumpkin into chunks and place the chunks in the blender to puree.
- Pour into in zippered freezer bags in desired amount and freeze.

by jphilo | Oct 14, 2015 | Recipes
 Today’s post falls into the win-win category for me and my sweet daughter, who just started her own blog over at Acorn & Oak Leaf. She needed to get the word out about her blog. I needed a recipe for today, but a busy travel schedule left no time for cooking.
Hence this offering from my daughter for whole wheat no-knead bread. She serves it often when we visit, so I can tell you it is delicious. It is also dairy-free and easy to make. So head on over to Acorn & Oak Leaf for step-by-step directions and pictures to learn how to make this hearty bread that’s perfect alongside fall soups and stews.

 Just in time for the big Thanksgiving grocery shopping trip, here’s the recipe for the Fabulous Franklin Chex Mix. The recipe traces its roots back to Zoe Hemmingson, one of Mom’s fellow teachers at Franklin School in Le Mars, Iowa.


