by jphilo | Dec 29, 2017 | Recipes
Our family loves Thai soup. So I’m always on the look out for recipes that taste like what I’ve been served at good Thai restaurants. In September, I found and tucked away a slow cooker chicken Thai soup recipe until December and winter arrived. It was an immediate hit for several reasons. First, because of the slow cooker, it was fairly easy to put together. Second, it is gluten, dairy, and soy-free so it required no modifications for our dietary needs. Third, it tasted delicious and received the coveted Hiram seal of approval. And fourth, it can be easily doubled or even tripled to create freezer meal.
My version of the recipe (which I couldn’t find on Parade’s Community Table recipe page) is slightly easier than the original and uses easier-to-find ingredients. Also, I through rice noodles into the mix to make the soup a hearty and complete meal.
Slow Cooker Chicken Thai Soup
2 lemons, zested
3 cups chicken or turkey broth
1/4 cup fish sauce (can use soy sauce)
1 (2 inch) piece ginger, peeled and grated
6 strips lime zest
1 thinly sliced shallot or 2 thinly sliced green onion
1/4 cup red curry paste
1 1/2 pounds chicken hindquarters
4 ounces mushrooms, thinly sliced
1 can unsweetened coconut milk
1 finely chopped large carrot
3 tablespoons lime juice
1 (16 ounce) package of Thai rice noodles
1/4 cup chopped cilantro
1 teaspoon dried basil or 2 tablespoons chopped, fresh basil
1 thinly sliced green onion
1 red, yellow, or orange sweet pepper, thinly sliced
Preheat the slow cooker. Place lemon zest, broth, fish sauce (or soy sauce), ginger, lime zest, shallot or green onion, chicken hindquarters, and mushrooms in cooker. Cover and cook on high for 2 1/2 hours or on low for 5 hours.
Remove chicken from cooker and cool before picking meat off the bones. Then put it back in the cooker.*
Add coconut milk, chopped carrot, and red curry paste. Cook on high for 30 minutes longer or for 1 hour on low.
20 minutes before serving, prepare the Thai noodles according to package directions. Place them in a large bowl.
Right before serving, stir in lime juice, cilantro, basil, and green onion.
To serve, place rice noodles in the bottom of each soup bowl. Then ladle soup onto the noodles. Garnish with chopped cilantro and sliced green onions, along with the sweet pepper slices and add some red pepper flakes for heat if that’s your jam.
*If making freezer meals, allow this mixture to cool and place in labeled gallon zipper bags. Proceed with the rest of the recipe when you serve the freezer meal.
SaveSave
SaveSave
SaveSave
SaveSave
SaveSave

by jphilo | Nov 15, 2017 | Recipes
Life around here is getting into a making-it-through-fall-with-1-broken-foot-and-a-pregnant-woman groove. Basically, that means we’re always on the hunt for recipes that are tasty, nutritious, easy, and economical. Now that we’ve become one of “those families” with a variety of food allergies–dairy for Jolene, Anne, and Kailen, soy (for sure) and gluten (perhaps) for Tad–the recipes also need to be adaptable to those restrictions.
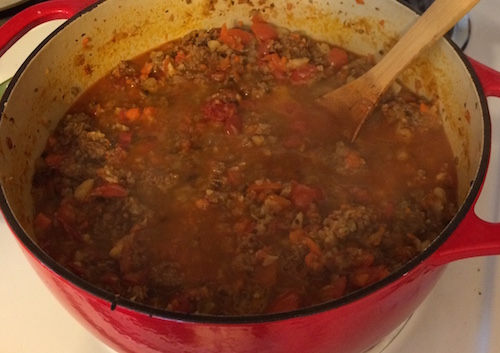
Today’s recipe for beef ragu was found in a free magazines distributed by Hy-Vee, a regional grocery store chain. Made in a slow cooker, it meets the “easy” requirement. The main ingredients listed were nutritious, inexpensive ones like tomatoes and carrots. I substituted an inexpensive chuck roast for the flank steak to make it even more economical. Four of the five of us thought it was mighty tasty. The Man of Steel warmed up to the flavors once he, as our token adult dairy eater, sprinkled it with parmeseon cheese. The only modification made was preparing gluten-free noodles for Tad.
The only fail of the night was when the cook forgot to take a picture before she started eating. But I managed to prepare the entire meal and set the table with no help (other than asking someone else to drain the noodles) despite a broken foot, so I’m feeling good. We all agreed this recipe is a keeper that can be doubled or tripled to make freezer meals. So it’ll hit our table again, and I’ll snap a picture then. In the meantime, here’s the recipe:
Slow-Cooker Beef Ragu
1 1/2 pounds chuck steak
3/4 teaspoon salt
1/2 teaspoon black pepper
2 (14.5 oz) cans diced Italian-style tomatoes with onion and garlic
1/4 cup water
2 medium carrots, chopped
6 cloves garlic, peeled and crushed
2 bay leaves
1 teaspoon Italian seasoning
3 tablespoons tomato paste
12 oz. wide egg noodles, cooked and drained
Cut chuck roast into chunks and place in slow cooker. Add tomatoes, water, garlic, carrots, bay leaves, and Italian seasoning. Stir well. Cover and set cooker on low for 5-6 hours. Discard bay leaves and stir in tomato paste. Serve over cooked noodles and enjoy!
SaveSave
by jphilo | Sep 28, 2016 | Recipes
Once again, this recipe comes to you courtesy of multi-generational living, via my daughter. During July and August she prepared this bolognese sauce whenever the tomatoes threatened to take the kitchen hostage. The wide variety of vegetables make the sauce a banquet of flavors mingling together. And it’s a good way to clean out the vegetables languishing in the fridge. Just remember that the secret of good sauce is to let it simmer for several hours. So you’ll be wise to start it right after lunch. But be warned–smelling the sauce all afternoon will work up a big appetite. So make plenty!
Clean Out the Vegetable Drawer Bolognese Sauce
1 pound ground beef
1 onion, diced very fine
2 carrots, diced very fine
2 stalks celery, diced very fine
2 cloves garlic
1/2 small head of cauliflower, chopped into small pieces
4 or 5 fresh tomatoes, roughly chopped
2 tablespoons or more olive oil
2 teaspoons salt or more to taste
1/4 cup red or white wine
balsamic vinegar (optional)
In deep, heavy pot heat the olive oil over medium high heat. Sauté onions, carrots and celery until onions are translucent. While sautéing the vegetables, add the salt. Add the cauliflower, chopped into small pieces, roughly the size of cooked ground beef.
When the vegetables begin to brown, add the ground beef. Cook until the beef is browned. Add in the garlic, pressed or chopped finely. Add the tomatoes. Stir and let the mixture come to a simmer. Simmer the sauce until the tomatoes and the juice reduce and thicken, 2–3 hours.
Once reduced, add wine. Simmer for a bit and taste. Add more salt if needed. Keep in mind that favors will be stronger in the end. Let the sauce simmer and reduce for about an hour more. The end product shouldn’t be chunky but not watery, rather than saucy like marinara. The tomato and red wine should stick to the meat and vegetables much like stir fry sauce does. Taste again. The flavor should be rich and savory. If it’s a little weak ,add 1 tsp balsamic vinegar, stir and let cook for 10 more minutes. Serve over spaghetti noodles.

by jphilo | Sep 21, 2016 | Recipes
Along our gravel road, cookies are considered an art form. Within that art form, chocolate chip oatmeal cookies sit at its summit. I thought I had scaled that particular peak with a wonderful dairy-free recipe that uses “futter,” Gravel Road’s affectionate term for all non-dairy shortenings. However, my daughter found a no shortening recipe from the Half-Baked Harvest website. The daughter’s version cuts the sugar and chocolate chips by half and uses dairy-free chocolate chips (this time from Trader Joe’s) so it is really, truly a non-dairy delight.
No Futter Chocolate Chip Oatmeal Cookies
2 eggs, beaten
1/2 cup brown sugar
2 1/2 cups rolled oats
2 cups whole wheat flour
1 teaspoon baking soda
1 teaspoon salt
1 cup canola oil
2 teaspoons vanilla
1 cup dairy-free chocolate chips
Preheat oven to 350°. Put eggs, sugar, oats, flour, soda, salt, canola oil, and vanilla in a large bowl. Mix them well by hand. Mixture will be crumbly. If it is too dry, add a few tablespoons of rice milk, cashew milk, or some other milk substitute. Add the chocolate chips and mix well.
Use your hands to make balls of dough and place them on heated baking stones. Press the balls down with your hand. Bake 10-12 minutes. Let them sit on the baking stone a few moments before removing them from the baking stone.
Save
Save
by jphilo | Sep 14, 2016 | Recipes
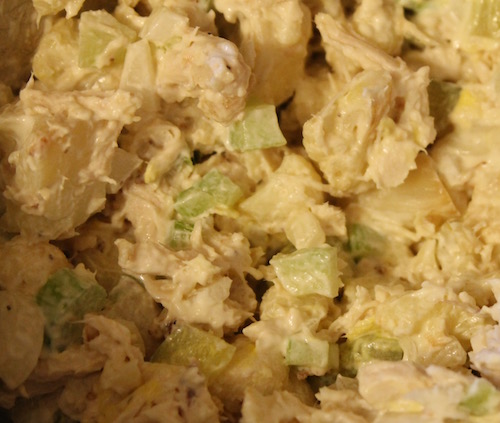
Sharing the kitchen with my daughter and her family has many advantages. One of the greatest advantages is that I am in charge of only half the meals. Another is the opportunity to learn new recipes from the cook who’s in charge of the other half of the meals. Here’s her take on chicken salad. I never would have guessed how much cauliflower can add to this simple dish.
Anne’s Chicken Salad
2 chicken breasts, cooked and cubed
1/2 large onion, chopped
2 celery stalks, chopped fine
4 large pickle spears, chopped
1 small head cauliflower, chopped into bite-sized pieces
1 cup mayonnaise
salt and pepper to taste
Saute cauliflower in olive oil until some pieces begin to brown. Remove from heat.
Combine chicken, onion, celery, pickles, and cauliflower in a large bowl. Add mayonnaise 1/4 cup at a time until it reaches the consistency you like. Add salt and pepper to taste. Refrigerate 2-4 hours before serving with your favorite bread or on a bed of lettuce.
Save
by jphilo | Aug 17, 2016 | Recipes
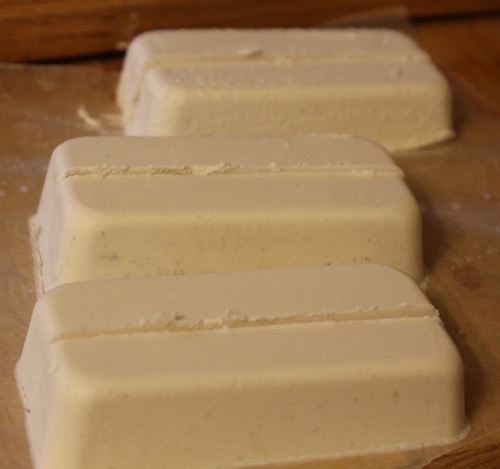
A new conundrum has arisen in our Gravel Road kitchen. In addition to having several adults in the house who have dairy allergies or lactose intolerant, the toddler has begun to sprout a terrible diaper rash when he’s fed soy. So the most available version of Earth Balance, our favorite butter substitute known affectionately as “futter,” is off limits to him. (Earth Balance has a soy free version, but it is almost impossible to find where we live.)
Thankfully, my daughter discovered a recipe for a very good vegan butter substitute created by Miyoko Shinner. Her recipe offers variations for baking futter (regular and hard versions), spreading, futter, and unsalted futter. The daughter has fiddled with the recipe and perfected a version that is very good for baking and meets all our high maintenance dietary needs.
Gravel Road Futter
Ingredients
- Combine all ingredients in blender and process at a medium speed for about one minute.
- Pour into a container of your choice*
- Set it in the refrigerator for a few hours until hard.
For a Harder Futter substitute ¼ cup of the melted coconut oil with ¼ cup melted cocoa butter. Reduce liquid oil by 1 tablespoon.
For Whipped Futter increase the liquid oil by one tablespoon, and process at high speed in the blender for about 2 minutes to incorporate as much air as possible. (We have tried this version several times without success.)
For Unsalted Futter leave out the salt.
*We use mini-loaf pans that hold 1 cup each. Once the futter is hard, it can be cut into 1/2 cup sticks the same size as regular sticks of butter or margarine.
Save