by jphilo | Feb 10, 2022 | Recipes
My husband is spending the weekend at our son and daughter’s-in-law farm. I was invited too, but am staying home in hopes of shaking the cough that is the last vestige of a virus that likes me much more than I like it.
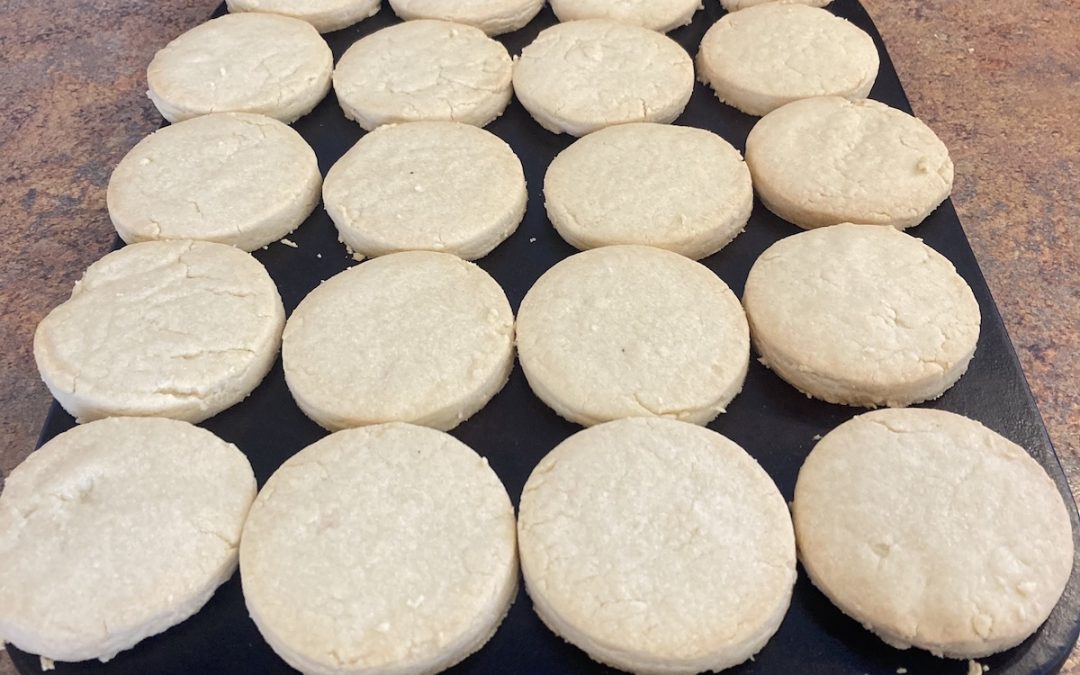
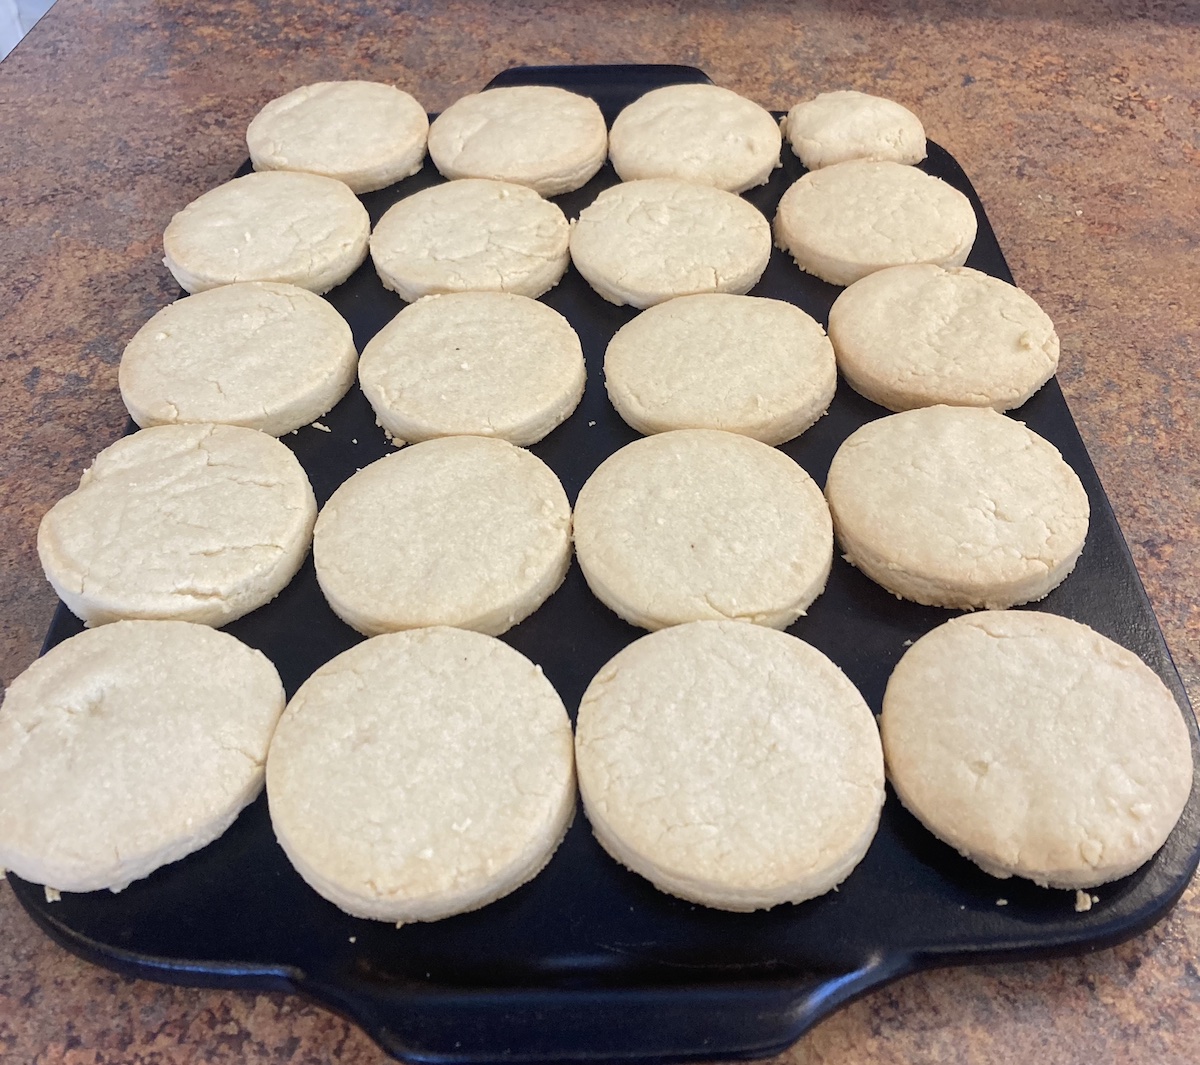
The guys will watch the Super Bowl on Sunday, so I’m sending a batch of shortbread for them to enjoy. This is our son’s favorite cookie, and I can’t believe the recipe hasn’t been featured here before. (I’m also sending crumb top apple pie for my daughter-in-law.) Both recipes are from the Betty Crocker Cookbook that was a wedding present in 1977. Shortbread been a cookie staple at our house for over 40 years.
With only 3 ingredients, it’s easy to make. It tastes best after a few days stored in an airtight container at room temperature…if it lasts that long.
Super Bowl Shortbread
1 1/2 cups softened butter (preferably made with butter made from Snippy’s cream)
1/2 cup sugar
4 cups all purpose flour
Heat oven to 350°. Cream butter and sugar. Work in the flour. If the dough is crumbly, mix in 1 to 1 tablespoons softened butter.
Roll dough 1/3 inch thick on a lightly floured surface. Use a small water glass to cut into rounds. Place 1/2 inch apart on a hot, ungreased baking stone. Bake for about 20 minutes or until set. Remove from stone to cool.
by jphilo | Jan 26, 2022 | Recipes, See Jane Run!
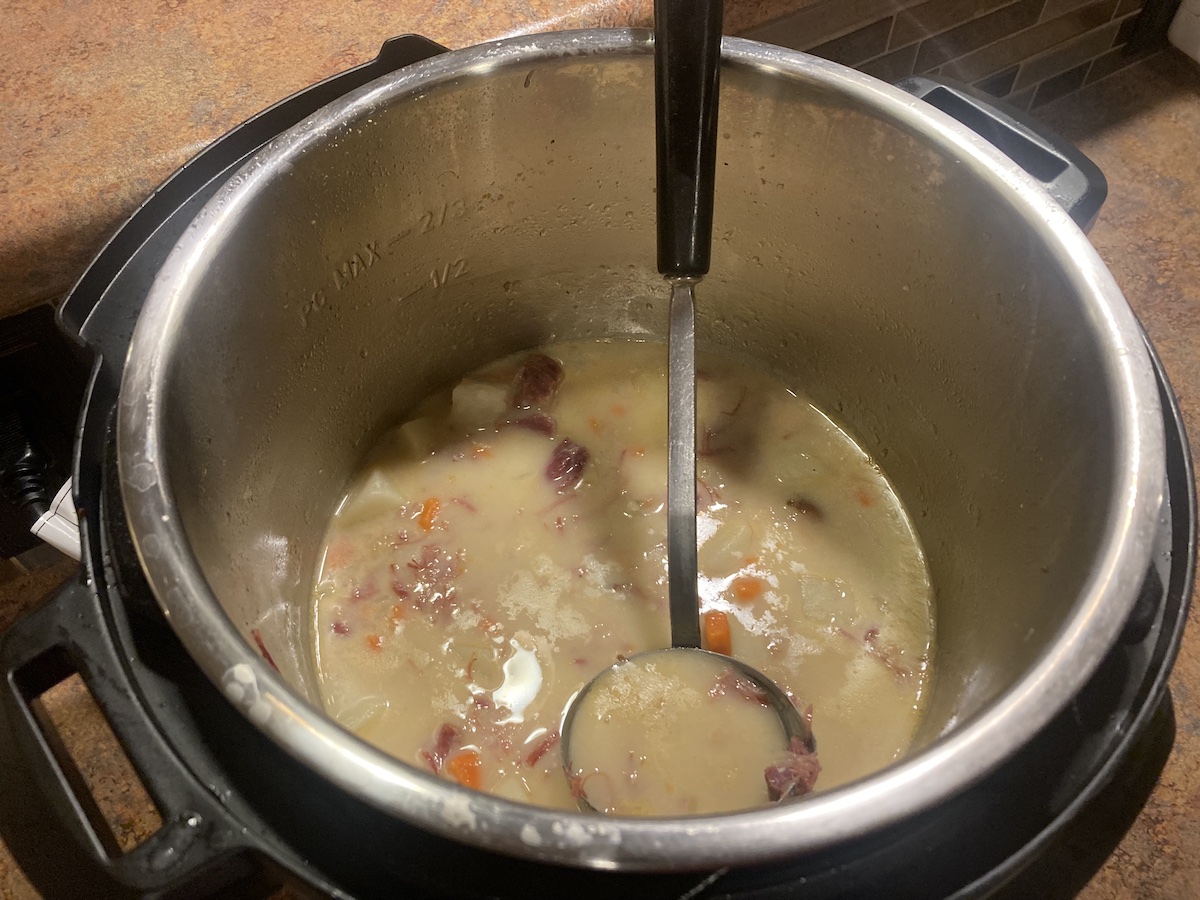
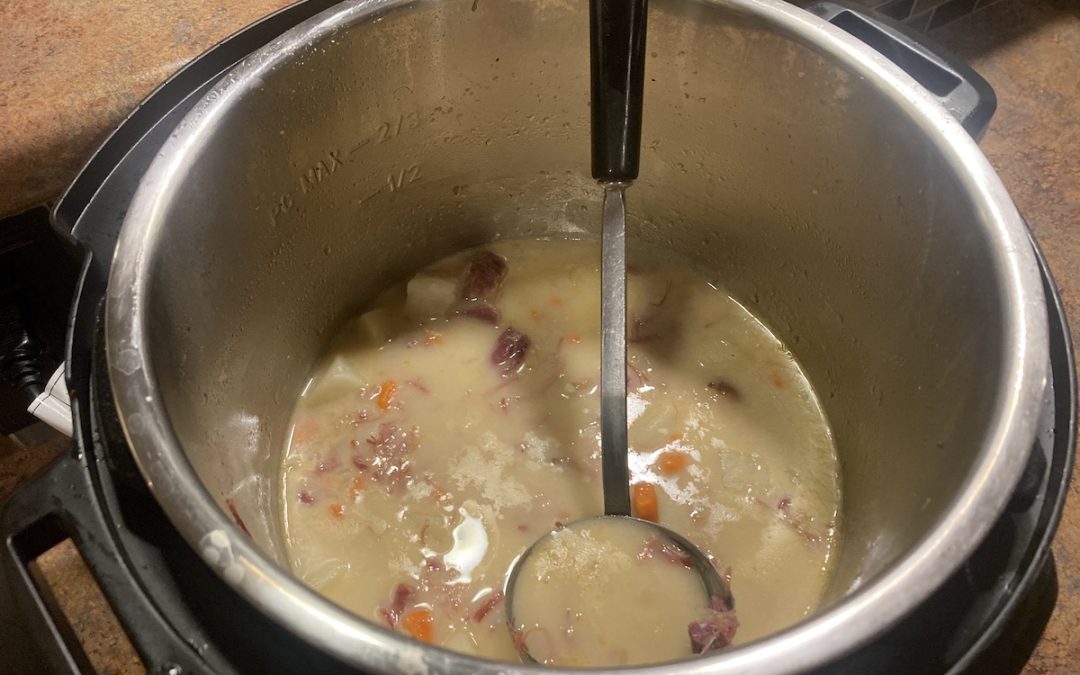
Ham and potato soup has been a favorite of ours for decades. When we lived in South Dakota, I made it with fresh milk that an old farmer sold for fifty cents a gallon.* We skimmed almost a quart of cream off every gallon and added some of that to the soup, too. My love of potato soup continues too this day, but making a dairy-free version to rival what I was used to before being diagnosed with a dairy allergy has been a struggle.
Until now.
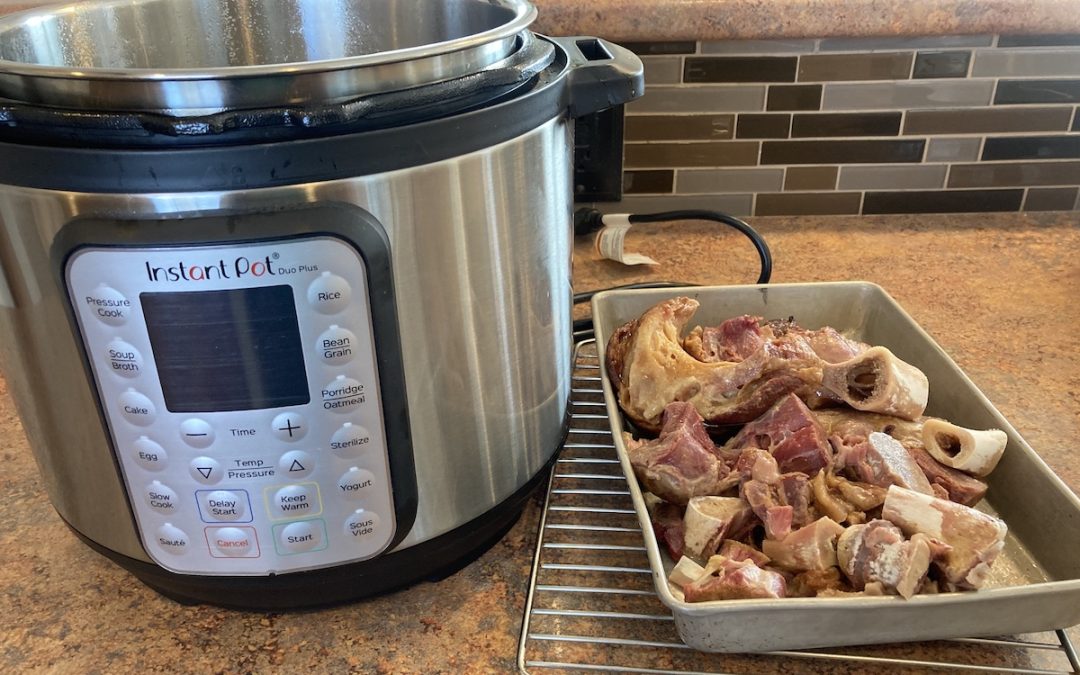
With the addition of our Instant Pot and my daughter’s knack for using cashews to make foods creamy, the ham and potato soup I served our family last night was a winner. We were so hungry before supper, I forgot to photograph the full pot. As you can see, there wasn’t much left! Also, I prepared the ham hocks in the Instant Pot the day before, a process which yielded the broth used in the soup.
Ham and Potato Soup in the Instant Pot
2 cups cooked, cubed ham or the meat picked off two cooked ham hocks
6 cups ham, chicken, or vegetable broth
2 pounds potatoes, peeled and cubed in 1/2-1 inch cubes
2 tablespoons Earth Balance butter substitute
1 large carrot, chopped
1 medium onion, diced
3 cloves garlic, minced
salt and pepper to taste
1/8 cup raw cashews
1 quart shelf stable coconut or oat milk
Soak the cashews in hot water for a few minutes. Put them in the blender with 1/2 cup of the coconut or oat milk and blend until smooth.
Using the saute setting on the Instant Pot, melt the butter substitute. Add the carrot, onion, and garlic. Saute until onions are transparent. Add the potatoes, ham, and broth to the pot. Season with salt and pepper to taste. (If using ham broth, you won’t need more salt.)
Secure the lid on the Instant Pot. Be sure the venting button is set to seal. Using the pressure cooking function, set the timer for 10 minutes. When the Pot beeps to signal the end of the 10 minutes, turn venting button from seal to vent to quick release the pressure.
When the pressure has been released, take off the lid. Turn on the keep warm function and add the blended cashews and the rest of the coconut or oat milk. Serve when the soup reaches your preferred temperature.
*The complete story of the farmer and his amazing milk cow, Snippy, made its way into See Jane Run! and the other books in my cozy mystery series. They are available on Amazon.
by jphilo | Jan 21, 2022 | Recipes
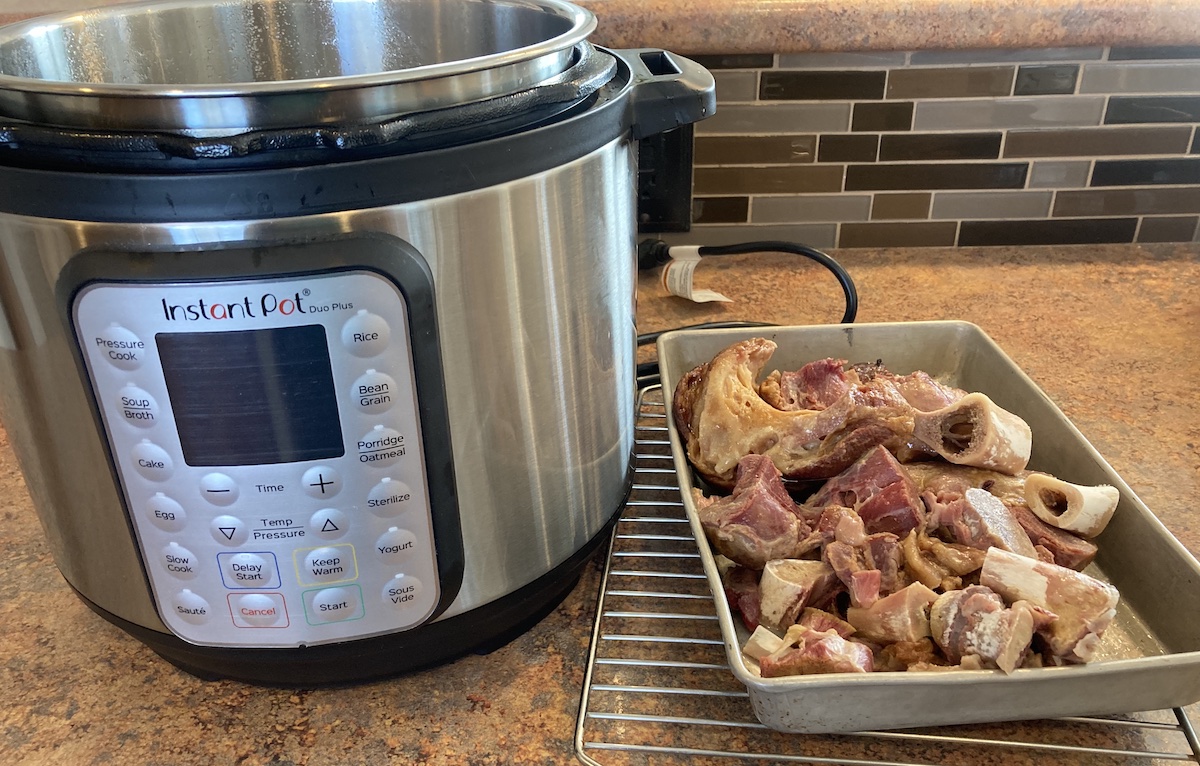
Cooking ham hocks in the Instant Pot is amazingly simple. I discovered that fact after deciding to use *ham hocks from the freezer in Instant Pot ham and potato soup. That soup was also amazing simple, delicious and believe it or not, dairy free. The recipe can be found at this link.
Ham Hocks in the Instant Pot
2 ham hocks (Ask the butcher to cut each hock into 2-3 pieces to make it easier to pick off the meat.)
6 cups water
Put the ham hocks and the water into the Instant Pot. Secure the lid and be sure the venting button is set to seal. Using the pressure cooking function, set the timer for 40 minutes. Push start.
When the pot beeps to signal the end of the forty minutes, let the pot natural release the pressure for 20 minutes. Then move the venting button to vent so the remaining pressure releases.
When all the pressure has been released, remove the lid. Using a slotted spoon remove the hocks. Put them in a pan to cool. When sufficiently cooled pick off the meat and discard the bones.
Use the meat and the liquid in the pot as ingredients for ham and potato soup, ham and bean soup, or other ham-based soups.
*Those of you who are eagerly awaiting the release of See Jane Run! on June 7, 2022 should know that cooking ham hocks in the Instant Pot is a totally Jane kind of thing to do. Except that Instant Pots weren’t around in 1977 when the story takes place. But if they had been, she’da been using one.
by jphilo | Jan 5, 2022 | Recipes
Caramel apple dip used to be a favorite snack at our house. But once the kids were grown and my dairy allergy was diagnosed, I quit making it.
I missed it. Oh my how I missed it.
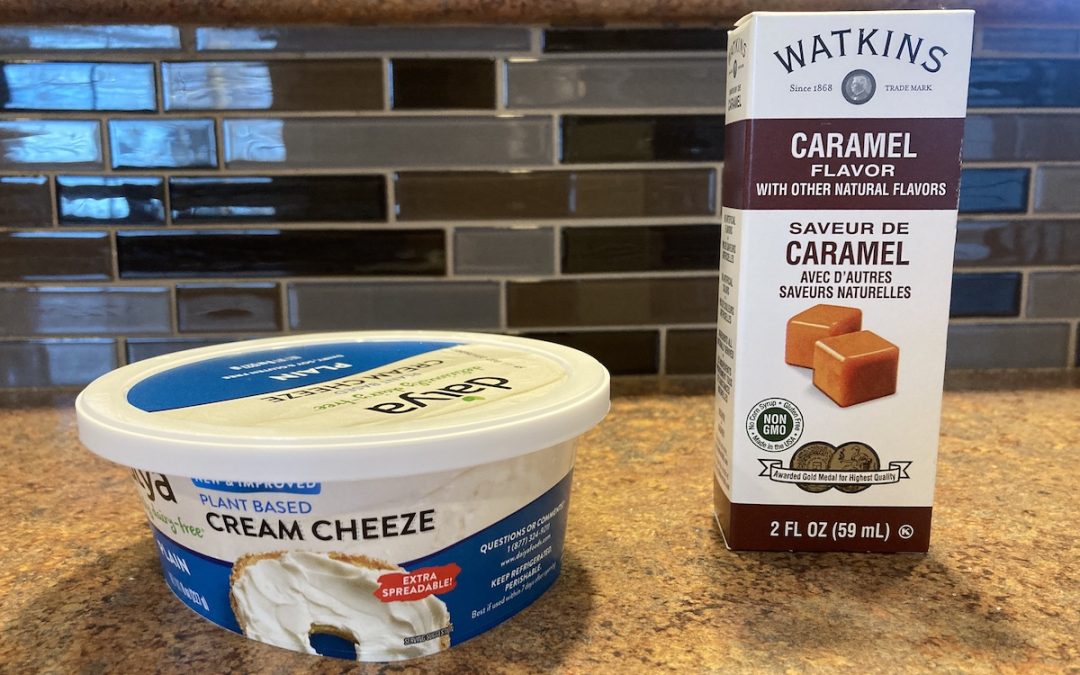
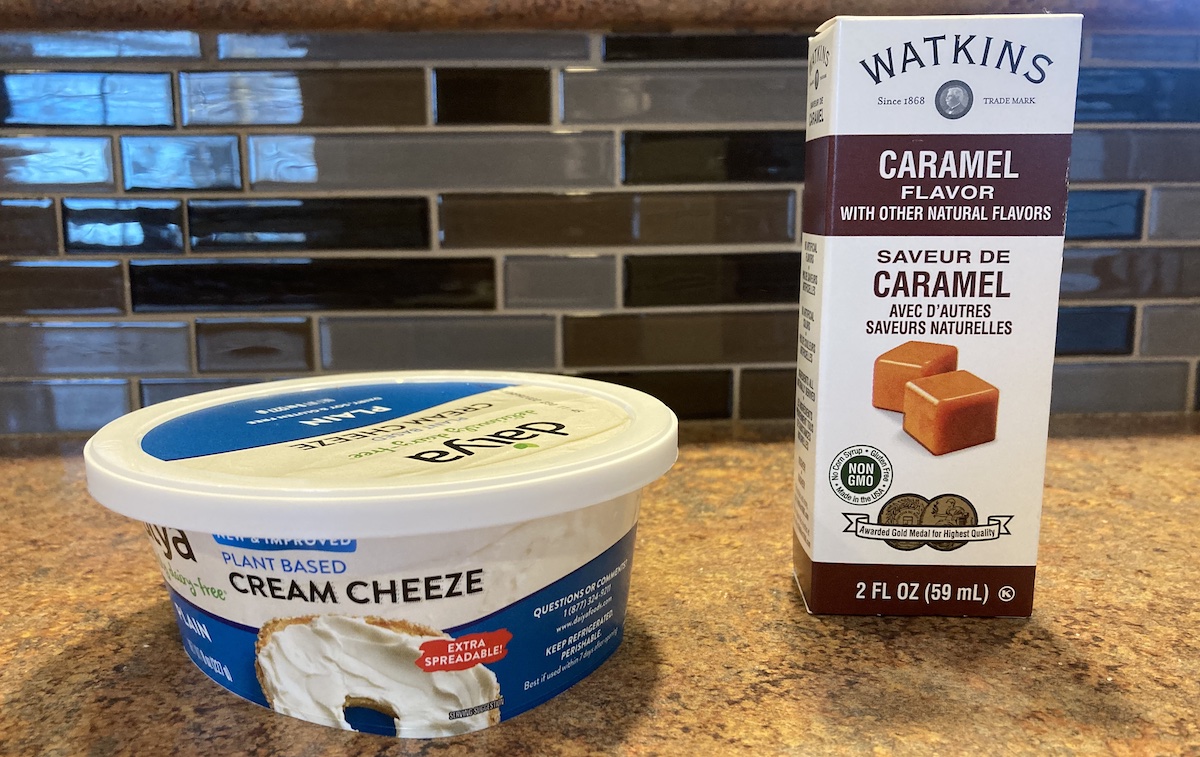
I was resigned to life without this treat until my daughter-in-law made a chance comment when we were together for Christmas. My daughter and I mentioned that Baker’s Pantry–a Mennonite grocery store we frequent because they sell 40-50 pound bags of all manner of bread baking staples–carries Watkins extracts.
That’s when my daughter-in-law said, “We used to mix their caramel extract with a little brown sugar and cream cheese to make apple dip.”
That’s when the lightbulb lit up in my brain. From the expression on my daughter’s face, I think she had a lightbulb moment too. We immediately added Watkins caramel extract to our Baker’s Pantry grocery list for the shopping trip we had scheduled for New Year’s Eve morning.
On the way home from Baker’s Pantry, we stopped at Hy-Vee, an Iowa-based grocery chain. They carry just about everything, including Daiya cream cheese substitute made from coconut. Most cream cheese substitutes are soy-based, and our granddaughter can’t have soy. (As I’ve said before, with her soy issues and dairy issues for 5 of the 6 people in this house, we are that family.)
A couple nights ago, I made the caramel apple dip and served it for dessert. It was a big hit. With everybody. Absolutely delicious. There are not enough superlatives to do the dip justice. And it was so easy. Incredibly easy.
You’ll find the recipe below. Use regular cream cheese if dairy isn’t an issue for you. Use one of the soy-based substitutes if that works at your house. However, you have to use Watkins caramel extract or the flavor superlatives won’t apply.
Dairy-Free Caramel Apple Dip
8 ounces Daiya cream cheese substitute at room temperature
1/2 teaspoon Watkins caramel extract
2 tablespoons brown sugar
Put the cream cheese substitute into a bowl and mash it with a fork to loosen. Add caramel extract and brown sugar. Continue mashing with a fork and mixing until smooth. Refrigerate until serving it with apple slices.
by jphilo | Dec 8, 2021 | Recipes
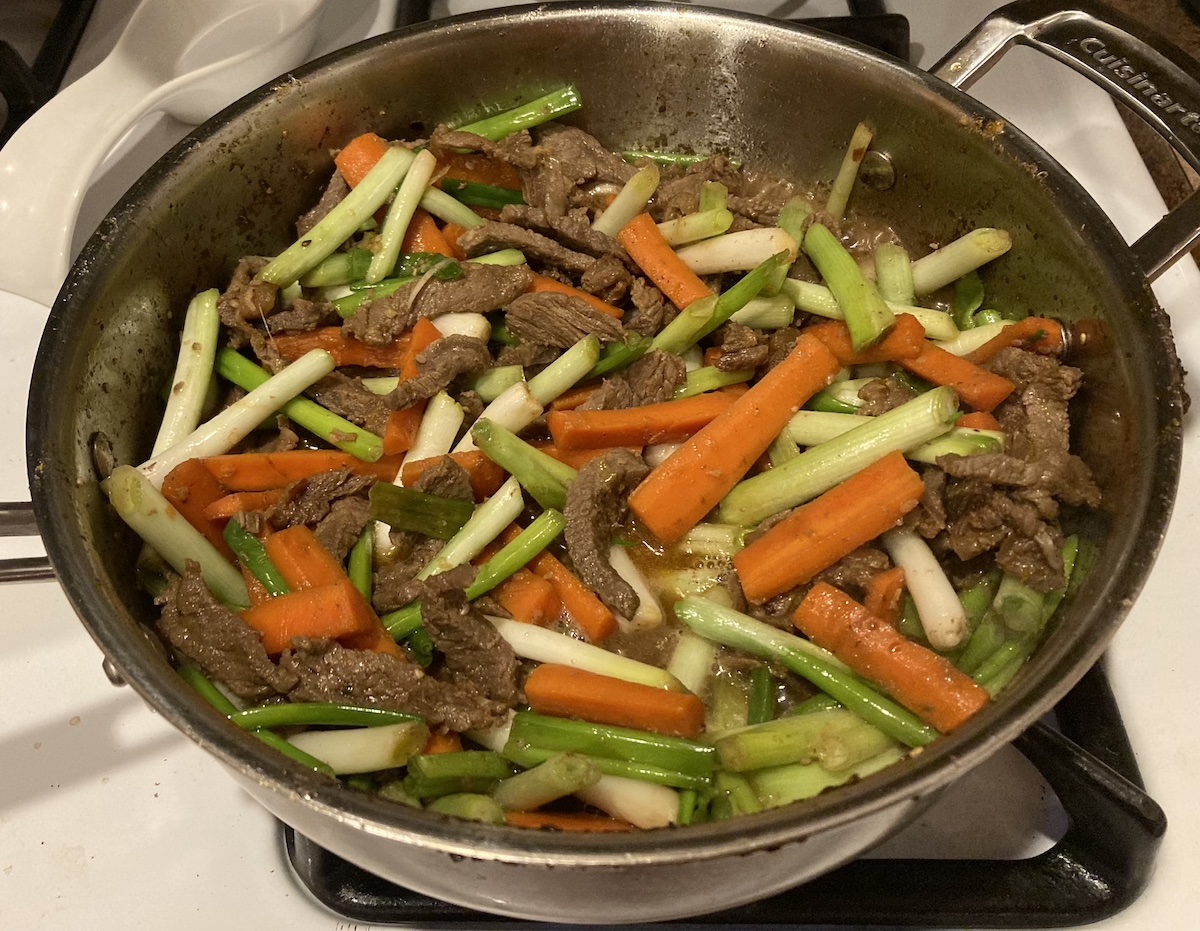
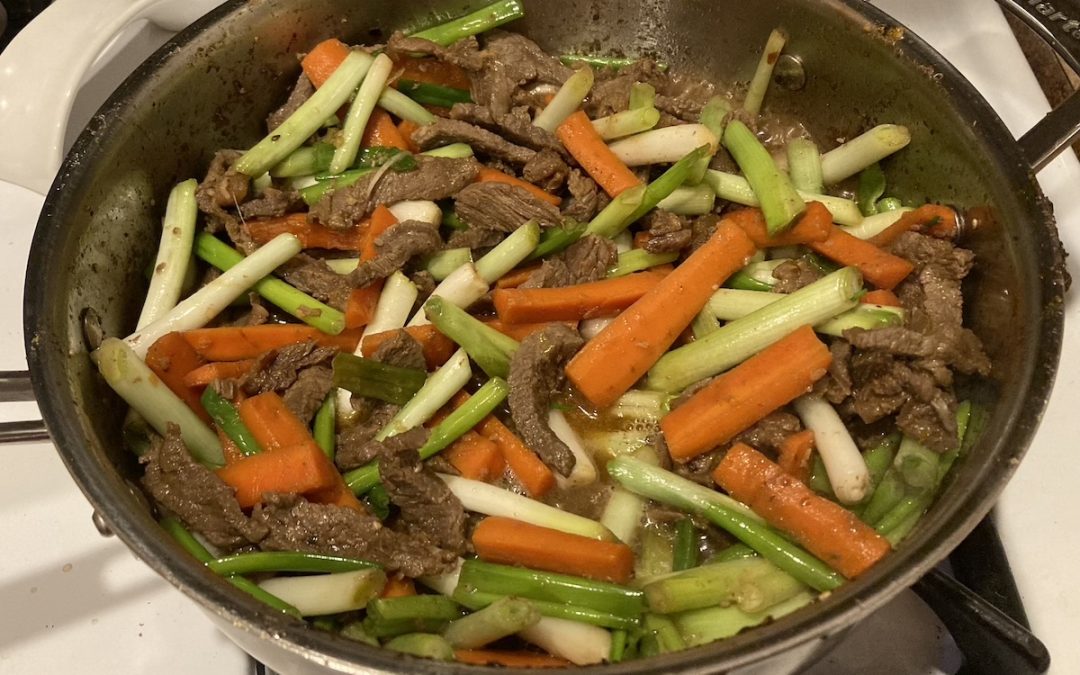
Mongolian beef is one of my husband’s favorite dishes. When I brought home our local grocery store’s seasonal magazine and saw a recipe for Mongolian beef made with hamburger. I decided to adapt it to meet our multigenerational family’s purposes. That meant:
- Supplementing the traditional green onions with vegetables (carrots) the grandkids will put in their mouths.
- Using beef that hasn’t been ground.
- Doubling the recipe so 4 adults and 2 children could get enough to eat.
Here’s our adjusted recipe.
Mongolian Beef
2 pounds lean beef (roast or steak) cut into thin strips
3 T sesame oil, divided
6 cloves garlic, minced or pressed
1 T fresh garlic, grated
4 T mirin (rice wine)
4 T rice vinegar
1 T brown sugar
1/4 cup soy sauce
1/2 cup water
2 tsp. sesame seeds
1/4 tsp. crushed red pepper flakes
4 bunches green onions cut into 2 inch lengths
2 large carrots peeled and cut into bite-sized pieces (skip this ingredient if you want a more traditional dish)
2 T toasted sesame seeds (for garnish)
8 cups cooked rice
Put 2 tablespoons of sesame oil into a large pan set at medium high heat. Add beef strips and cook through and juices have been cooked off. Remove from pan. Add remaining tablespoon of oil. Add carrots and stir fry until they just begin to cook. Add garlic and ginger. Saute until fragrant, about 2 minutes. Add the mirin, rice vinegar, brown sugar, soy sauce, and water. Cook until liquid begins to thicken. Add green onions and stir fry for another minute or 2. Serve over rice and sprinkle with toasted sesame seeds.
Editorial Note: The 6-year-old wouldn’t eat the carrots because he said they tasted weird. He refused to eat the meat at first because he thought it looked like poop. (6-year-olds are obsessed with poop.) Once convinced it wasn’t poop, he tasted and downed it in record time.) The 3-year-old ate the carrots and rice, but not the meat. They ate the green peas I prepared as a back up vegetable. Why they didn’t refuse those because “pea” and “pee” sound the same, I’ll never know.

by jphilo | Mar 2, 2021 | Recipes
Mom’s apple dumplings (as in author Jolene Philo’s mom and not fictional protagonist Jane Newell’s mom) were mouthwateringly good. My mom learned how to make them from her mother, who made them in a huge, metal dishpan to feed her large family. Neither Mom or her mom used a recipe. At some point in my adulthood I badgered Mom into writing out a recipe so I could make them for our kids. They loved them.
So much so that last Saturday my adult daughter Anne said she was craving apple dumplings. She asked where to find the recipe. I pointed her to the electronic version from a 2015 post at this website. She made them Saturday evening, and she served them for dessert after Sunday dinner. They were eagerly devoured by all. My heart was as full as as my stomach as I watched my grandchildren (ages 5 and 3) become fans of Mom’s apple dumplings. Once Mom can come visit again, Anne and I will make a batch for her to enjoy with us. I think she’ll like seeing an old tradition being embraced by a new generation.
Mom’s Apple Dumplings
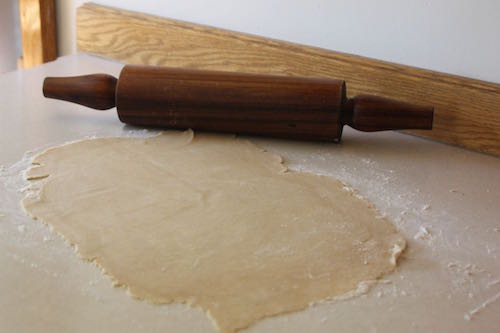
Step 1: Make a batch of Grandma Conrad’s Never Fail Pie Crust. Let it sit for at least 10 minutes.
Step 2: In a saucepan, combine 2 cups water, 1/2 cup sugar, 3 tablespoons butter (or Earth Balance Vegan Stick for a non-dairy version), and 1/4 teaspoon cinnamon. Bring to a rolling boil. Remove from heat and set aside.
Step 3: Peel, core, and slice 6–8 cups of apples. Put them in a large mixing bowl. Add 1/4 cup of sugar and 1 1/2 teaspoons cinnamon. Mix together until apples are coated with sugar and cinnamon.
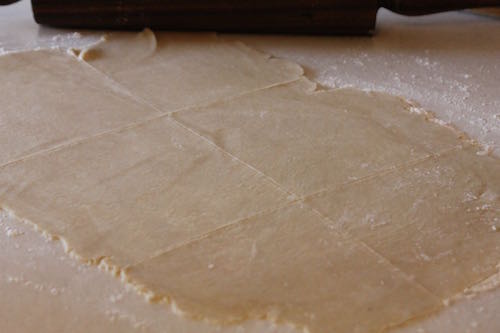
Step 4: Preheat the oven to 425 degrees. Take 1/4 of the pie dough and roll it into a rectangle about 15 inches long and 8 inches wide.
 With a paring knife, cut the dough into 6 pieces.
 Fill each section of dough with as much of the apple mixture as it can hold.
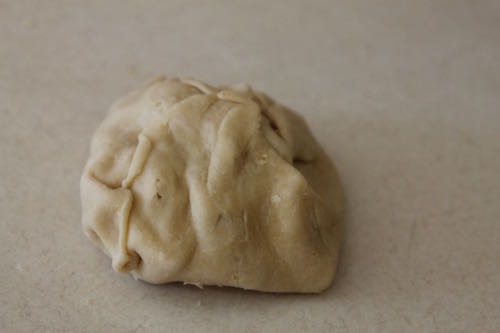
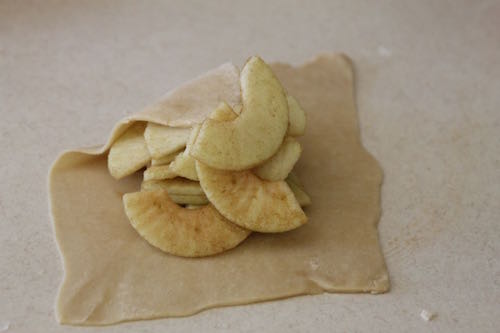 Fold the dough up and around the apples.
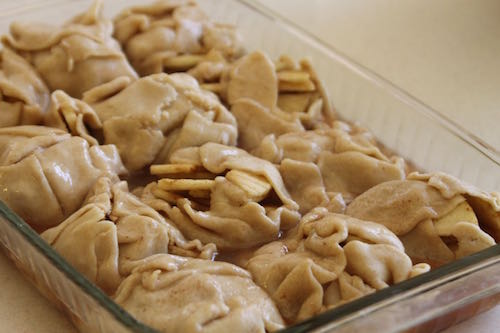
 Place 12 dumplings in a 9 x 13 inch baking pan. Pour the syrup over the dumplings.
 Bake the dumplings at 425 degrees for 15 minutes. Turn the oven down to 350 degrees. Continue baking for 30–35 minutes until the apples are soft when a fork is inserted into one of the dumplings.
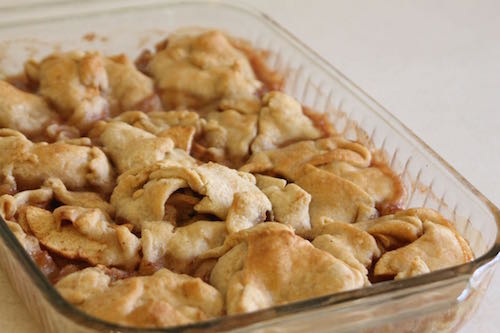
Cool and serve with ice cream, milk, or half-and-half or dairy-free alternatives.
Sign up to receive website updates and See Jane Run! book news on Gravel Road’s home page right under the picture of–you guessed it–the gravel road.